JSON Data
- Introduction
- JSON and Sub-Objects
- JSON and Arrays
- Using JSON with Javascript
- Using JSON to send Data from Client to Server
- JSON and sending data from Server to Client
- JSON from the Server-side and the Template Tester
- JSON Functions and Special Flags
- Interrogating JSON Data
- BSON Queries and JSON
- Using JSON with Reports
- Including Image data in a JSON schema object.
Description
JSON, or Javascript Object Notation, is simply a terse way of storing javascript objects.
Introduction
In many programming languages, to create an object you must first create a variable and then create the children of that variable independently. For example, you could define an object named 'o' in javascript like this:
var o = new Object();
o.firstName = 'Selwyn';
o.lastName = 'Rabins';
Using this method, the children of the 'o' object would need to be created one by one; each one including the name of its parent object. This results in a lot of code that is often difficult to interpret. In this case the object 'o' has a very simple name. However, it is not be hard to imagine situations in which the object name is much longer or where the programmer wants a child of the object to be an array or an object in and of itself. JSON provides a compelling alternative that makes this task straightforward. Rather than define each child individually, all of the children that belong to an object are enclosed in curly brackets. Each child in the object, except for the last child, is then delimited using a comma.
var o = {
    firstname: 'Selwyn',
    lastName: 'Rabins'
}
The simplicity of JSON's format has made it ubiquitous in Web application development. JSON is very frequently used for data storage, where it is gaining in popularity over xml, and many websites return data in JSON format. This makes it possible, for example, to pull news stories off the web in json format, work with apps like twitter, or call external servers and ask for things. Once you acquire this JSON it is then very easy to manipulate. Among other things you can filter out fields, add fields, or extract an individual element from the data. JSON is the ideal way for sending complex data from the client to the server, or from the server to the client. Having a good understanding of JSON is therefore very helpful in building web applications.
In the javascript language JSON is processed inline. This means that you can use JSON in javascript and it will be automatically recognized by the javascript engine. You can add objects, arrays, and literal values to your JSON data, write some javascript code to build a given part of an object, and it will just work. When the javascript engine comes across any JSON data it knows that a sub-object is a sub-object, an array is an array, and a literal value is a literal value. You do not have to parse JSON in javascript.
Most of Alpha Anywhere's server-side code is written in Xbasic, a language that does not support JSON natively. However, Alpha Anywhere does support a lot of methods that work with JSON and allow you to both import and export JSON to and from your components. How do these methods work? When you create a JSON object, the children of that object are read in Xbasic as a string. The Xbasic methods then take that string, work against it, and return either JSON or Xbasic. Alpha Anywhere's set of methods can do the same thing for Xbasic objects, returning either JSON or Xbasic. This gives you the ability to parse a string into an object and an object into a string. For example, take the following Xbasic object:
dim o as p
dim o.firstName as c = "Selwyn"
dim o.lastName as c = "Rabins"
You could create an 'o' object like the one above in Xbasic. It would work, but you would end up having to write a lot of unnecessary code for each of the 'o' parent object's children. Include Alpha Anywhere's JSON parse method, and you can easily simplify things by placing the data for 'o' object's children into a JSON format:
dim o as p
o = json_parse("{firstName: 'Selwyn', lastName: 'Rabins'}")
Using JSON with Xbasic
The example below demonstrates how you can apply this information in building a UX component using Xbasic on the server-side that uses JSON. To be used as Xbasic, JSON needs to be a string. For more information you can follow this video here.
Create JSON from Xbasic
In Alpha Anywhere's toolbar click on the Interactive Window button. This will open the Code editor.
In the Code Editor, go to the Interactive tab and define the following dot variable name 'pp' by entering this code. This is an Xbasic object. Hit Enter at the end of every line.
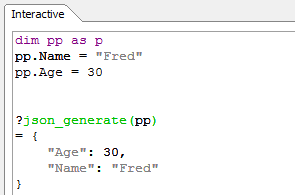
dim pp as p
pp.Name = "Fred"
pp.Age = 30
Now add ? json_generate(pp) to the end of the pp object. Hit Enter again.
dim pp as p
pp.Name = "Fred"
pp.Age = 30

? json_generate(pp)
You should see a generated JSON representation of the pp object. You have successfully serialized the 'pp' object into a JSON string.
In JSON objects start with a curly bracket and end with a closed curly bracket. Inside the object are name value pairs. All property names are double quoted. In this object, for example, the property names are "Name", "Age". JSON can also encode the logical values true and false. Add a new 'Married' property to your Xbasic code and set it to true 'pp.Married = .t.'.
dim pp as p
pp.Name = "Fred"
pp.Age = 30
pp.Married = .t.
Now run this object again using ?json_generate(pp). The generated JSON should look like this:
= {
    "Name": "Fred",
    "Age": 30,
    "Married" : true
}
In addition to creating JSON data from Xbasic you can also instantiate an object from a JSON string. The following example will demonstrate how.
Create Xbasic from JSON
In Alpha Anywhere's toolbar click on the Interactive Window button. This will open the Code editor.
The Code Editor will open. Click the New Script using Xbasic Editor button on the top left of the Code Editor's toolbar.
This will open a new tab in the Code Editor. Enter the following code. Hit Enter after every line.
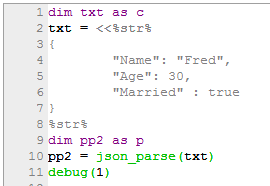
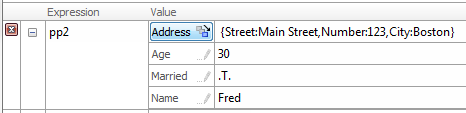
dim txt as c
txt = <<%str%
{
    "Name": "Fred",
    "Age": 30,
    "Married" : true
}
%str%
dim pp2 as p
pp2 = json_parse(txt)
debug(1)
In Xbasic the angle bracket, angle bracket << defines a string whose definition expands over multiple lines. Here we have defined all of our JSON data as an Xbasic string and have given that string a variable name of 'txt'. A Xbasic object named pp2 is then created that takes as its value the parsed txt variable.The debug(1) has been added to the end of this code so we can see the JSON data in the debugger. Click the lightning bolt in the toolbar to run the code.
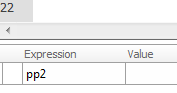
The Xbasic debugger will open. Type 'pp2' into the Expression entry box at the bottom of the debugger.
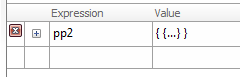
Hit Enter and then click the expand or 'plus' button , to the left of the Expression box, to show all of the JSON data in the pp2 object.
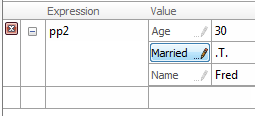
The expanded Expression box lets you drill down.
JSON and Sub-Objects
The previous example showed how to parse a string containing JSON data that contained simple literal values. However, what if you wanted to create sub-objects within your data? As the objects in the examples above demonstrate, all properties in JSON are delimited with a comma; except for the last property which has nothing after it. As long as a property is delimited and has a property name in double quotes followed by a colon, the definition can be an object, array, or literal. To see how to create a sub-object in JSON that can be used with Xbasic watch this video, or follow the guide below.
Creating a Sub-Object in JSON to use with Xbasic
In Alpha Anywhere's toolbar click on the Interactive Window button. This will open the Code editor.
The Code Editor will open. Click the New Script using Xbasic Editor button on the top left of the Code Editor's toolbar.
Enter the same code into the Code Editor that you did in step 3 of the 'Create Xbasic from JSON' example. The code should look like this.
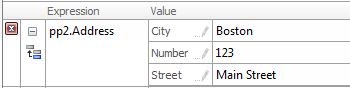
Now place a comma after the "Married" property. Hit enter and on the line below the "Married" property add a new property name called "Address".
Place a colon next to the 'Address' and a set of curly brackets. Inside the brackets add three more properties; a "Street" property, "Number" property, and a "City" property,
dim txt as c
txt = <<%str%
{
    "Name": "Fred",
    "Age": 30,
    "Married" : true,
    "Address" : {
        "Street" : "Main Street",
        "Number" : 123,
        "City" : "Boston"
    }
}
%str%

dim pp2 as p
pp2 = json_parse(txt)
debug(1)
Now click the lightning bolt icon in the Alpha Anywhere toolbar to run this code. The debugger should open. type pp2 into the Expression entry box at the bottom of the debugger and hit Enter.

Click the Expand or plus button to the right of the Expression entry.
Click on the Address value to expand the Address sub-object that you defined. You should see all of the JSON data from the sub-object you defined inside of your Xbasic code.
JSON and Arrays
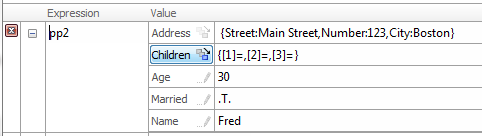
Arrays in JSON start with a square bracket [ and end with a square bracket ]. JSON arrays are base 0, meaning the first element in a JSON array is 0, the second element is 1, the third element is 2, and so on. This is different from Xbasic which is base 1. Arrays can contain literal values or objects themselves. This example will show how to add an array property to your JSON data named "Children", to be used in an Xbasic object named pp2. This array will use objects as its elements. The first element in the array will be this object {"Name" : "John", "Age" : 3} which has the "Name" of "John" and an "Age" of 3. Like all objects, each of the properties within this object are delimited by a comma, with the exception on the last property in the object. For more information on the steps that follow watch this video
Creating an Array in JSON to use with Xbasic
In Alpha Anywhere's toolbar click on the Interactive Window button. This will open the Code editor.
The Code Editor will open. Click the New Script using Xbasic Editor button on the top left of the Code Editor's toolbar.
Enter the following code into the New Script page in the Code Editor.
dim txt as c
txt = <<%str%
{
    "Name": "Fred",
    "Age": 30,
    "Married" : true,
    "Address" : {
        "Street" : "Main Street",
        "Number" : 123,
        "City" : Boston
    },
    "Children" : [
        {"Name" : "John", "Age" : 3}
    ]
}
%str%

dim pp2 as p
pp2 = json_parse(txt)
debug(1)
Create two more elements for the "Children" array. As with objects, each element in the array should have a trailing comma; excepting the last element which has no comma. The result should look something like this:
"Children" : [
    {"Name" : "John", "Age" : 3},
    {"Name" : "Sally", "Age" : 5},
    {"Name" : "Kim", "Age" : 7}
]
Now click the lightning icon in the toolbar and run the code. The Debugger should open. Enter pp2 into the Expression box at the bottom on the debugger.

Click the Expand or 'plus' button next to the Expression box to see all of the properties in the pp2 object.
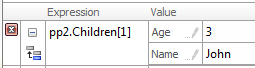
Click on the Children array property that you defined. The elements within that property will be displayed.
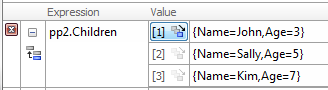
Now click on one of the elements in your Children array in the Value list. You should be able to see the object properties for each element.
This example has shown how to create a complex Xbasic object using data parsed from JSON that includes an array. You can also pass things from Xbasic into JSON using json_generate(). Here is How.
Show your Xbasic object's data in JSON form
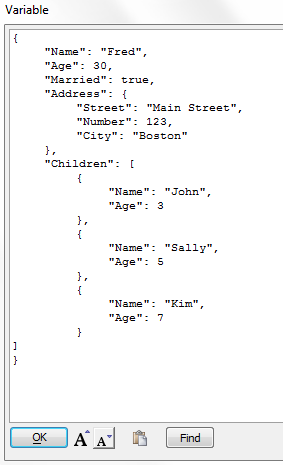
Remove the debug(1) line in your code and add this to the end instead. This code will output the JSON from the pp2 Xbasic object using the json_generate() method. The showvar() method will display the result.
dim txt2 as c
txt2 = json_generate(pp2)
showvar(txt2)
Click the lightning icon to run the code. A Variable dialog will open displaying the pp2 objects data in JSON form. The result should look something like this:
Using JSON with Javascript
So far, this guide has shown how to serialize objects, but you can also use Javascript on the client-side to work with JSON. This example will demonstrate how you can incorporate JSON into a UX component and then manipulate the JSON data using Javascript. For more information watch this video Part 1 and Part 2. To recap, we have covered the following about JSON objects so far. A JSON object starts and ends with curly brackets and has as many name value pairs as you want within those curly brackets. Each name value pair is delimited with a comma. Each entry can be an array, a literal, or an object. In this way it is possible to represent a very complex object using JSON while still maintaining the ability to easily read and understand it
Output a JSON on the Client-side in a UX Component
In the Web Projects control Panel click the New Component or File button. In the New File dialog select Web Component and click Next. Select UX and click Next again.
On the Select UX Component template page leave the Start with a blank UX Component radio button selected and click OK.
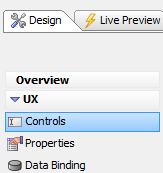
On the Design tab of the UX Builder open the UX Controls page from the menu list.
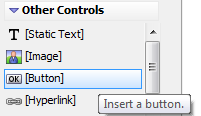
On the Controls page, open the Other Controls dropdown that appears in the Design menu. Double click on the [Button] control option to add it to your UX component.
Add a [Static text:] control to your component in the same way.
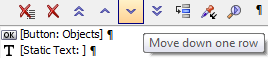
You can arrange the controls using the up and down arrows in the toolbar such that they go [Button], [Static Text:].
Click on the [Button] control in your list to highlight it. Go over to the Control Properties list to the Right. Find Button Properties.
In the Button Properties section find the Button text property and change the button text to 'Objects'.
Scroll down the Properties list until you reach the Javascript (Touch. Mouse. Pointer Events) section. Click the button next to the click property.
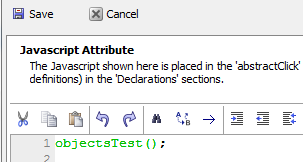
The Edit Click Event dialog will open. Click the Text mode radio button. In the Javascript Attribute work area write objectsTest(); and click Save.
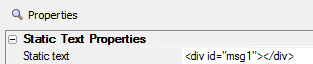
Now Click on the [Static Text:] control that you created. In the Properties menu under Static Text Properties find the Static text property.
Next to the Static text property enter the following html:
<div id="msg1"></div>
Still in the Controls page, find the Code dropdown in the menu and under it click the Javascript functions option. Enter the following code to define the objectsTest() function.
function objectsTest() {
    var obj = {
        "Firstname" : "Fred",
        "Lastname" : "Smith",
        "Children" : [
            {"Name" : "Jackie", "Age" : 10},
            {"Name" : "Joan", "Age" : 12}
        ]
    };

    var msg = JSON.stringify(obj);
    $('msg1').innerHTML = msg;
}
Here we have designed a button that will create an object in Javascript, serialize that object to JSON, and then print the JSON data out. The var obj is a javascript variable object that is initialized by passing into it a JSON string. This is the equivalent on the Xbasic side to using JSON parse to instantiate an Xbasic object from a JSON string. In this example we are initializing an object using an object literal. An object literal and JSON look similar but are not technically identical. Our object literal contains a Firstname property, Lastname property, and a Children property which is an array containing additional object properties. After defining the object literal, a call javascript method, JSON.stringify(), is used to serialize the object into a string with the name msg1. Using innerHTML, this msg1 string is then inserted into the text of the div that we defined for the [Static text] control in our component. This means that when the 'Objects' button is clicked, using javascript, the [Static text] control will be filled in with html that displays the JSON data.Go to Working Preview and click on the 'Objects' button.

Create a Button that Parses JSON data
In the Web Projects control Panel click the New Component or File button. In the New File dialog select Web Component and click Next. Select UX and click Next again.
On the Select UX Component template page leave the 'Start with a blank UX Component' radio button selected and click OK.
On the Design tab of the UX Builder open the UX Controls page from the menu list.
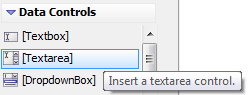
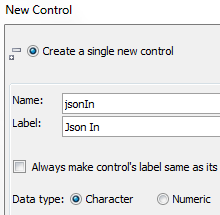
On the Controls page, go to the Data Controls dropdown section in the design menu and double click on the [TextArea] control option.
In the New Control dialog that opens select 'Create a single new control'. Give the control the Name jsonIn and the Label Json In. Under Data Type select Character and click OK.
On the Controls page, open the Other Controls dropdown that appears in the Design menu. Double click on the [Button] control option to add it to your UX component.
Select the [TextArea] control that you labeled Json In. Look to the right. In the Field properties section inside the Control Properties list, find the Default value property.
Change the Default value to be this string of JSON.
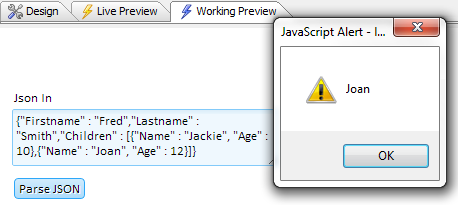
{"Firstname" : "Fred","Lastname" : "Smith","Children" : [{"Name" : "Jackie", "Age" : 10},{"Name" : "Joan", "Age" : 12}]}Select the [Button] control in the control list. In the Properties list on the right find the Button Properties section.
In the Button Properties section, change the Button text property to read Parse JSON.
Scroll down to the Javascript (Touch. Mouse. Pointer Events) properties section and click the button next to the 'click' property.
The Edit Click Event Editor will appear. Click on the Text Mode radio button. In the Javascript Attribute work area type parseJSON(); and click Save.
In the design menu open the Code dropdown and click on the Javascript functions option. Under the objectsTest() function that you defined earlier write the following code.
function parseJSON()  {
    var json = {dialog.object}.getValue('jsonIn')
    var obj = JSON.parse(json);
    alert(obj ['Children'][1]['Name']);
}
Just like on the Xbasic side where we use json_parse and json_generate there exists similar features in javascript on the client-side. In this example, the parse JSON button is taking a string of JSON from a text area field , parsing it , and then doing an alert from the name field of the second item in the children array. Square brackets are used for syntax in order to read a value in the 'Children' array, that was defined in our JSON data . You can also use dot notation to accomplish this, for example obj.children. The [1] next to the Children array indicates that we are calling the second element of that array. Javascript arrays are zero based, meaning the first item in the array is always 0 the second item is 1. The second element, in the JSON data here, is an object containing a "Name" property, "Joan", and an "Age" property, '12'. The ['Name'] that follows the [1] in our code means that we are only interested in returning the "Name" property. When you run this component and click the parse JSON button, an alert should return "Joan".Now go to Working Preview and click the Parse JSON button. You should see an alert pop up giving you the name of the second element in the Children array from the JSON data you defined for the Text area control.
Using JSON to send Data from Client to Server
JSON is useful for passing information form the client to the server. One way to accomplish this is by passing information into an Ajax callback. In this case, you might have a button that is tied to an AJAX callback which turns around and calls up some Xbasic. You could then add some of Alpha Anywhere's JSON functions to that Xbasic code to allow you to go out, get JSON data from an external source, and then return that data to your component in Xbasic.
Xbasic is currently the coding language on the server. Sometimes you need to turn Xbasic code into something the client side browser can recognize, i.e Javascript. The easiest way to get into the client is through Javascript. When someone clicks a button do an Ajax callback, that callback is handled in Xbasic, which does some manipulations and then returns an object to the client browser in the form of a string. The browser, which is waiting for the response, then takes that object and generates some actual JSON, that it returns to the client.
When you want to parse a complex set of data, you can parse JSON data back into an ajax callback and, on the Xbasic side, parse that data and extract values from it. For more information on how to do this watch the following video or follow the examples below.
In the Web Projects control Panel click the New Component or File button. In the New File dialog select Web Component and click Next. Select UX and click Next again.
On the Select UX Component template page leave the 'Start with a blank UX Component' radio button selected and click OK.
On the Design tab of the UX Builder open the UX Controls page from the menu list.
On the Controls page, go to the Data Controls dropdown section in the design menu and double click on the [TextArea] control option.
In the New Control dialog that opens select 'Create a single new control'. Give the control the Name jsonIn and the Label Json In. Under Data Type select Character and click OK.
Select the [TextArea] control that you labeled Json In. Look to the right. In the Field properties section inside the Control Properties list, find the Default value property.
Change the Default value to be this string of JSON.
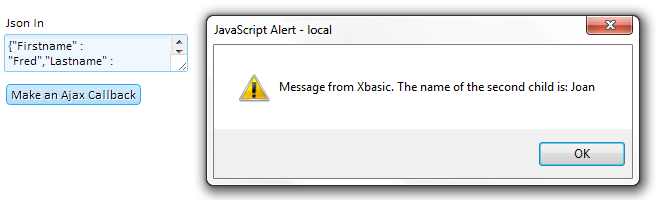
{"Firstname" : "Fred","Lastname" : "Smith","Children" : [{"Name" : "Jackie", "Age" : 10},{"Name" : "Joan", "Age" : 12}]}On the Controls page, open the Other Controls dropdown in the menu and double click on [Button] control to add it to the UX component.
With the Button control selected, look in the control Properties list on the right. Under the Button Properties section, find the Button text property.
Change the Button text property to read 'Make and Ajax Callback'
Scroll down the Properties list until you reach the Javascript (Touch. Mouse. Pointer Events) section. Click the button next to the click property.
The Edit onClick Event dialog will open. Select the Action Javascript radio button option at the top and click the Add New Action button.
In the Action Javascript Select and Action dialog select Action Callbacks and Javascript from the Categories list on the left.
From the Actions: list on the right select Ajax Callback. And click OK.

An Action Javascript Ajax Callback dialog will open.
In the Ajax Callback section of the dialog, leave the Callback type property set to InternalXbasicFunction and type xb next to the Function name property.
In the Advanced section of the dialog, find the Additional data to submit property and next to it type additionalAjaxData(). Click OK, OK, and Save.
 The Additional data to submit property represents the data that is going to be submitted from the client side to the server side. This property allows you to use an Xbasic function to return data. You can specify additional data to submit in the Action Javascript Ajax Callback genie. This data will be available inside your custom event handler, in this case the click event. What is expected from the Additional data to submit property is a Query string, name value pairs delimited with an & sign, type in a Review help text in Action Javascript Ajax Callback Action. This feature is useful when you want to generate arbitrary information on the client side.
Click on the Code dropdown and select Javascript functions. In the Javascript workspace add the following code.
function additionalAjaxData() {
    var json = {dialog.object}.getValue('jsonIn');
    //return '__additionalData=' + json;
    var data = A5.ajax.buildURLParam('__additionalData',json);
    return data;
}
Here we are reading the value that is in the text area field and sending back to the server a name value pair. This name value pair is formatted like a query string. The value part of the name value pair needs to be URL encoded. Inside the Alpha JS library there is a buildURL function that takes its first argument as name and its second argument as a value. The buildURL function then encodes that value.From the Code dropdown click on the Xbasic functions option. Add the following Xbasic.
function xb as c (e as p)

    dim json as c
    json = e.__additionalData

    dim p as p
    p = json_parse(json)
    dim msg as c
    msg = "Message from Xbasic. The name of the second child is: " + p.children[2].name

    dim js as c
    js = "alert('" + js_escape(msg) + "');"

    xb = js
end function
This code takes the string of JSON data that we defined earlier and sends it back to the server as part of an ajax callback. It then parses this information on the server using the parse function. Afterward, it extracts the name field, from the second array item in the children array, and uses this to construct an object that is fed into an alert message and passed to the client.
Going line by line this is what this looks like. The xb in this case is the actual Xbasic function that will handle the Ajax callback. In the line dim json as c, we create an Xbasic character variable called json. This variable is then set to = e.__additionalData. The e is a pointer variable that is passed into the xb function. It points to an object that contains a property called additionalData, which is a string that is sent back as part of the Ajax callback. The p in the line dim p as p defines an second Xbasic pointer variable that is set to =json_parse(json). The json_parse() function parses a string, in this case the json string that we defined, in JSON format and returns an Xbasic variable.
Next we create a javascript response to send back to the client. In dim msg as c we create yet a third Xbasic variable, a character variable called msg, that contains a string and the second element of the children array; the array that was included in the string that we parsed. In Xbasic arrays are 1 based, meaning the first element in the array is [1] and the second element is [2]. This is unlike Javascript which is 0 based. When msg is defined it is then passed into a js object that is tied to a javascript alert. When you return a string, you need to make sure it is Javascript safe. In dim js as c, a js object is created that is set to be an alert message that to be sent back to the client. Xbasic still views this alert message as a string, but javascript will interpret it as javascript. The line xb = js is equivalent to a return statement in javascript. In this case we are returning the js string to the javascript that operates the client side code.
Now go to Working Preview and click the Make Ajax Callback button. You should see something like this:
JSON and sending data from Server to Client
In this example, look at how you can make a callback from the client to the server to retrieve data from the server in JSON format and then work with the data that was sent back from the server and display it on the client. In some nicely formated html on the client side
Use JSON to send data from the Server to the Client
In the Web Projects control Panel click the New Component or File button. In the New File dialog select Web Component and click Next. Select UX and click Next again.
On the Select UX Component template page leave the 'Start with a blank UX Component' radio button selected and click OK.
On the Design tab of the UX Builder open the UX Controls page from the menu list.
Open the Other Controls dropdown and double click on [Button] to add a button to the UX component.
Click on the [Static Text] control in the Other Controls dropdown to add a static text control to the UX component.
Select the Static test control and look at the Control Properties list. In the Static Text Properties section change the Static text property to this:
<div id="msg2"></div>
Select the button that you added to you component. Go to the Properties list on the right.
In the Button Properties section change the Button text property to read Fetch data from server.
Go to the Javascript (Touch. Mouse. Pointer Events) section of the Properties list and choose the click property.
The Edit Click Event dialog will open. Leave the Action Javascript radio button selected.
Click the Add New Action button. The Action Javascript - Select an Action dialog will open.
In the Categories: list select Ajax Callbacks and Javascript option. In the Actions: list select Ajax Callback. Click OK.
The Action Javascript - Ajax Callback Action genie will appear. Set the Function name property to be xb2
Click the button next to the After callback complete Javascript property.
The After Callback Complete Javascript dialog will open. Add a function called expandTemplate(); and click OK and OK and OK again. Save.
 As you probably know Ajax is asynchronous. In creating this Ajax callback this means that you can't have the function, expandTemplate(), be triggered immediately. As a result, in this example you can not add more actions to the Edit Click Event dialog unless you click the Run actions synchronously button at the bottom of the dialog. In this example, we are leaving this unchecked.
Open the Code dropdown and click on the Javascript functions page. Enter the following code:
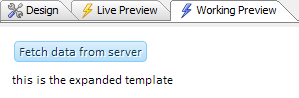
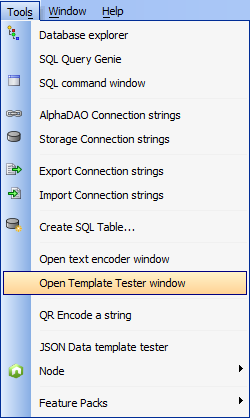
function expandTemplate() {

    var ele = $('msg2');

    //A5.u.element.setContent() is like setting the .innerHTML of ele, but preserves drag scroll behavior
    A5.u.element.setContent(ele, 'this is the expanded template');

}
Instead of setting .innerHTML directly we are using a helper function called A5.u.element.setContent(). This is the preferred way of writing this code if there is a possibility that drag scrolling is enabled. If the element that you are setting the .innerHTML on had grad scrolling enabled, and you set innerHTML directly, it would destroy the drag scrolling capability. Moving on, after the client receives the data we want to format it:Save your Component and go to the Web Projects Control Panel. From the Tools dropdown select the Open Template Tester window. On JSON tab click Load Example.
From the Select Example list choose the Simple object, simple template object. Click OK.
Want JSON that is standards compliant. JSON standard required double quotes. Highlight the inserted JSON and hit the Reformat JSON button.
Go to the Template page and change the html to read the following:
Hello <b>{firstname}</b><span style="color:blue;">{lastname}</span>Click the Show Javascript button. This will show the Javascript that takes data and expands the html. Copy this javascript to the clipboard.
Go to the Code dropdown again and open Javascript functions. Paste the Javascript into the expandTemplate function that you defined.
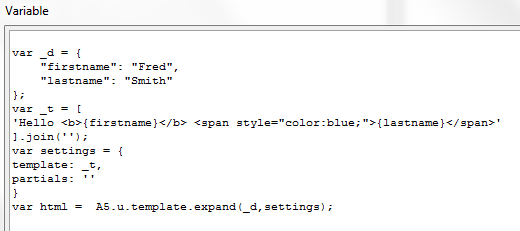
function expandTemplate() {

    var _d = {
        "firstname" : "Fred",
        "lastname": "Smith"
    };
    var _t = [
        'Hello <b>{firstname}</b>',
        '<span style="color: blue;">{lastname}</span>'
    ].join('');
    var settings = {
        template: _t,
        partials: ''
    }
    var html = A5.u.template.expand(_d,settings);
    var ele = $('msg2');
    A5.u.element.setContent(ele, 'this is the expanded template');

}
To get data returned by Xbasic callback open the Xbasic function page from the Code dropdown list. Enter the following code:
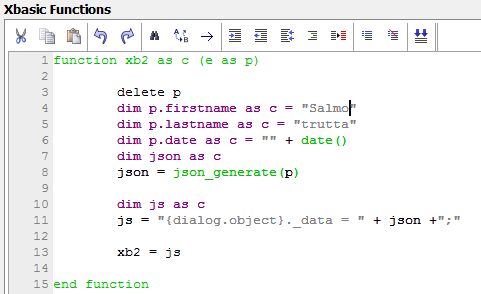
function xb2 as c (e as p)

    delete p
    dim p.firstname as c = "Fred"
    dim p.lastname as c = "Smith"
    dim p.date as c = "" + date()
    dim json as c
    json = json_generate(p)

    dim js as c
    js = "{dialog.object}._data = " + json +";"

    xb2 = js

end function
In this code dim json as c creates an Xbasic object. This object, json, is then set to be =json_generate(p). The json_generate() function takes a variable, in this case a variable called p, and returns JSON data in this object in the form of a string. Xbasic now has a string in Xbasic that can read and manipulate. Next we create an Xbasic object named js, in the line dim js as c, and set this equal to xb2. This code effectively places the JSON data inside a temporary variable inside the UX component.Go to the Working Preview tab. Click the Fetch data from server button.
Now back to your Javascript functions page and change the expandTemplate() function to include d = {dialog.object}._data;
Also change A5.u.element.setContent(ele, 'this is the expanded template'); to read A5.u.element.setContent(ele, html)
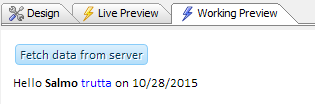
function expandTemplate() {

    var _d = {
        "firstname" : "Fred",
        "lastname": "Smith"
    };

    _d = {dialog.object}._data;

    var _t = [
        'Hello <b>{firstname}</b>',
        '<span style="color: blue;">{lastname}</span>'
    ].join('');

    var settings = {
        template: _t,
        partials: ''
    }
    var html = A5.u.template.expand(_d,settings);
    var ele = $('msg2');
    A5.u.element.setContent(ele, html);

}
Using A5.u.element.setContent() is like setting the .innerHTML of ele. Unlike .innerHTML, A5.u.element.setContent() preserves the drag scroll behavior. The _d in this code represents the data that the template will expand. Setting _d to {dialog.object}._data; makes _d draw its data from the Xbasic function definition we defined in step 23. When you run the component now you should see that the same data that is defined on the server-side, i.e in Xbasic.Go to Working Preview and click the Fetch data from server button again:

Go back to the Design tab. To make sure that your code is calling data from the server, reopen your Xbasic functions page in the Code dropdown.
Change the "Fred" and "Smith" in your xb2 function to something different, like "Salmo" and "trutta" or anything.
In the Code dropdown open the Javascript functions page again.
Now add something to consume the date. Change this line of code Hello <b>{firstname}</b> <span style="color: blue;">{lastname}</span> by adding on {date}:
'Hello <b>{firstname}</b><span style="color: blue;">{lastname}</span> on {date}.'Go to Working Preview and click button.
 To summarize, the Ajax Callback can be made to the server. The server Xbasic is now free to use any Xbasic code that it wants to compute data to send back to the server. Data that gets sent back is encoded on the server-side into an Xbasic object, in this case a p variable. This variable then gets converted into a JSON string which gets sent back to the client
JSON from the Server-side and the Template Tester
The client-side template tester window is very useful in laying out JSON data on the client side. The user interface for the Template Tester is resizable and has separate tabs for JSON Data, Template, Javascript and CSS. As you edit in any of these windows the template preview is automatically updated in the right part of the window.
While the Template Tester does help in presenting JSON data from the server-side on the client, It is still necessary to define some Xbasic and javascript in order to use a specific set of JSON data. When editing Xbasic or Javascript code, html, and JSON it is often helpful to be able to see the start and end of different opening and closing 'pair' delimiters. For example in an Xbasic function call, highlighting the opening an closing parentheses. Or in a Javascript function, highlighting the opening and closing curly braces. In some HTML text, the opening and closing tags (e.g. <div>, <body>, <p>, etc.)
Once a 'pair' has been identified, keyboard shortcuts (Control ] and Control-Shift ] ) allow you to quickly move focus from the start of the 'pair' to the end of the 'pair' or to select all of the text inside the 'pair'. For more on this watch the video below:
To follow the advanced example of processing JSON data returned from an Ajax Callback using client-side templates, watch the video below:
Create JSON from the Server side presented in an Advanced Template
In the Web Projects control Panel click the New Component or File button. In the New File dialog select Web Component and click Next. Select UX and click Next again.
On the Select UX Component template page leave the 'Start with a blank UX Component' radio button selected and click OK.
On the Design tab of the UX Builder open the UX Controls page from the menu list.
Open the Other Controls dropdown and double click on [Button] to add a button to the UX component.
Click on the [Static Text] control in the Other Controls dropdown to add a static text control to the UX component.
Select the Static test control and look at the Control Properties list. In the Static Text Properties section change the Static text property to this:
<div id="msg3"></div>
Select the button that you added to you component. Go to the Properties list on the right.
In the Button Properties section change the Button text property to read Fancy Report. Save your component.
In the Web Projects Control Panel click on Tools and select the Open Template Tester window from the dropdown.
Click Load Example. From the list of choices select the 'Same as previous example, but with CSS to style the output' option.
Copy JSON data to the clipboard.
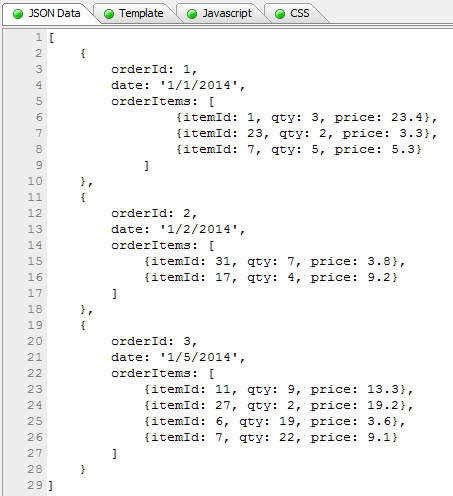 If you have completed the JSON and sending data from Server to Client guide you will notice that this template contains slightly more complex JSON data. As you can tell from the square starting brackets [ ], this JSON object is an array. Each item in the array is filled with an object whose name starts with 'orderId:'. The orderItems property inside this object is itself an array that contains objects as properties. Because there is this much nested data, computing this on the server is the appropriate thing to do. We then want to consume the JSON data on client side and output html. The Javascript function that gets called by the template Template uses some CSS, also defined in the genie, to take a simple example and expand it.
Go back to your component and, on the Controls page, select the button control your created.
Scroll down the Properties list to the Javascript (Touch, Mouse, Pointer Events) section.
Click the button next to the click property.
The Edit Click Event dialog will open. Leave the Action Javascript radio button selected.
Click the Add New Action button. The Action Javascript - Select an Action dialog will open.
In the Categories: list select Ajax Callbacks and Javascript option. In the Actions: list select Ajax Callback. Click OK.
The Action Javascript - Ajax Callback Action genie will appear. Set the Function name property to be xb3
Click the button next to the After callback complete Javascript property.
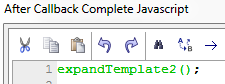
The After Callback Complete Javascript dialog will open. Add a function called expandTemplate2(); and click OK and OK and OK again. Save.
Go to the Code dropdown and open the Xbasic functions page. Define a function called xb3 using the following code:
function xb3 as c (e as p)
    dim json as c
    json = <<%txt%

    //Insert Template JSON here

    %txt%
    dim js as c
    js = "{dialog.object}._data2 = " + json +";"
    xb3 = js
end function
Paste the JSON you copied from the template into your xb3 function definition between json = <<%txt% and %txt%
Here we are using <<%txt% and %txt% delimiters. If you use the specify <<%json%... %json% delimiters to enter a long string of JSON data, the Xbasic editor will perform real-time validation on the JSON data. For example, in the image below, the JSON has an error because of the trailing comma after the last property (age: 23). Notice the squiggly red line indicating the error. If you click on the error indicator you will see the error message. In a real world example you would do data queries to get the JSON information. Take this JSON and put it into a temporary variable called _data2Go to the Javascript functions page. Define the function expandTemplate2() using this code.
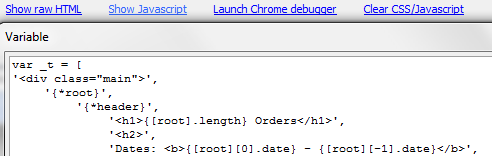
function expandTemplate2() {

    var _d = {
            "firstname" : "Fred",
            "lastname": "Smith"
    };

    _d = {dialog.object}._data2;
    var _t = [ /* Insert Javascript Here*/ ].join('');

    var settings = {
        template: _t,
        partials: ''
    }

    var html = A5.u.template.expand(_d,settings);
    var ele = $('msg3');
    A5.u.element.setContent(ele, html);
}
Go back to Open Template Tester window and click the Show Javascript hyperlink in the lower left of the dialog. Find the template section of the javascript marked var _t = [
Copy the Javascript between var _t = [ and ].join(''); in the Open Template Tester window.
Open the Javascript functions page in the Code dropdown. Paste the code you copied inside the expandTemplate2() function.
Go back to the Open Template Tester window. Open the Javascript tab and copy the javascript function displayed in the tab to clipboard.

In your component, open the Code dropdown in the Design tab. Go to the Javascript functions page and paste the function you copied above the expandTemplate2() definition.
Open the Open Template Tester window. Click on the CSS tab and copy all of the CSS code.
Open your component page. Go to the Properties page and find the CSS properties section.
Click the button next to the Local CSS definitions, click the code tab at the bottom of the CSS Editor[] and paste all of your CSS inside the editor.
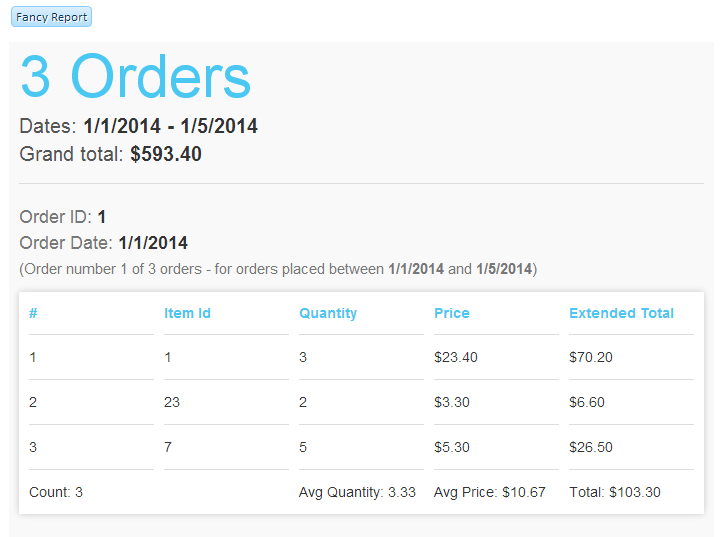
Now go to Working Preview. You should see something like this:
Open your component and go to the Xbasic functions page in the Code dropdown.
Try adding to or altering the JSON data that is nested inside your Xbasic function.
To summarize, an ajax callback can go to the server, get a very complex set of data represented as a JSON object, and send that data back to the client. Then using the templating features on the client side you can use that data to create a very rich layout from that JSON data. JSON can be used on the server side to serialize Xbasic objects. You can use json_generate to serialize Xbasic objects into json data and json_parse to parse json data back into Xbasic objects. On the client side you can use json_stringify and json parse to serialize objects into json strings and to parse json strings into javascript objects. json is the perfect mechanism for parsing information from the client side to the server side or the server side to the client side.
JSON Functions and Special Flags
The javascript object notation that Xbasic uses to parse JSON is not as full as the javascript object notation that exists in Javascript itself. Javascript can process functions as properties directly from JSON. In comparison, Xbasic requires a string of JSON to be able to parse data, which it then feeds into a browser. Converting everything, including all of the javascript extras, into string format prevents the JSON from blowing things up when it is used in Xbasic. On the other hand, not being able to use all of the types of data that can exist inside of JSON leads to a great loss in potential capability for an application. For example, say you had a completed date object in Javascript that was stored in JSON. If you transformed that JSON into a string, you would end with something that is transportable but that would not be transported. It would lose all functionality. The way Alpha Anywhere gets around this problem is through special Xbasic tags, flags, and nulls; markers that indicate logic that exists inside of JSON data. It is these flags that allow Xbasic to do everything with JSON that can be done in Javascript. Alpha Anywhere simply looks for parts of strings generated from JSON and, if it sees any, outputs them as javascript. For example: Here dim o as p is an Xbasic object. The o.myFunc = "function(){...}" defines a string
dim o as p
o.myFunc = "function(){...}"
Below is the output from the o.myFunc function produced by json_generate(). As you can see from the single quotes around 'function(){...}', the output is a string. Even if the flag in the generate function was false .f. you would get the same thing; a string will produce a string. If you ran this in javascript it would also view it as a string.
? json_generate(o,.t.)
= "{myFunc: 'function(){...}'}"
This is the same 'o' Xbasic object function. However, here the function is marked as a javascript function.
o.myFunc = "{javascript}function(){...}"This time, when we run the function in json_generate(), no single quotes appear. Javascript will view this as a viable function.
? json_generate(o,.t.)
= "{myFunc: function(){...}}"
If you were to turn the boolean flag in json_generate to false .f. then you would again end up with a string, as shown below. This string would include the bracketed {javascript} marker inside of it.
? json_generate(o,.f.)
= "{myFunc: '{javascript}function(){...}'}"
Interrogating JSON Data
There are several ways to use Xbasic to extract information from JSON data.
For JSON data that contains objects
First define a JSON object that lives in the extension namespace inside of Xbasic.
dim jso as extension::JSON
Next equate the object with the JSON data you wish to query using setJson(). You can read this data in from a file. Here we are going against JSON data that contains an object.
jso.setJson("{\"firstname\":\"john\",\"lastname\":\"public\"}")These different methods will return the following results:
"{\"firstname\":\"john\",\"lastname\":\"public\"}"Gets the number of properties for an object.
? jso.getLength()
= 2
Gets the number of properties for an object.
? jso.getIndexed(0)
= "john"
Gets an property by position. In this case, being base 1, it starts at 1.
? jso.getIndexed(1)
= "public"
Gets name of a property in an object. Zero is the first property.
? jso.nameIndexed(0)
= "firstname"
Gets the second property in an object.
? jso.nameIndexed(1)
= "lastname"
Gets name of a property in an object. Zero is the first property.
? jso.nameIndexed(0)
= "firstname"
Gets the second property in an object.
? jso.nameIndexed(1)
= "lastname"
Gets a value for a given property by looking it up by name.
? jso.getProperty("firstname")
= "john"
Another example of getting the value by looking it up by name.
? jso.getProperty("lastname")
= "public"
Query function. Is this an array?
? jso.isArray()
= .F.
Query function. Is this an object?
? jso.isObject()
= .T.
For JSON data that contains arrays
First define an JSON object that lives in the extension namespace inside of Xbasic.
dim jsa as extension::JSON
Next set the object to be the JSON data that contains the array you wish to query using setJson(). You can also read this data in from a file.
jsa.setJson("[\"one\",2,true,{\"firstname\":\"john\",\"lastname\":\"public\"}]")These different methods will return the following results.
"[\"one\",2,true,{\"firstname\":\"john\",\"lastname\":\"public\"}]"Gets number of elements for an array.
? jsa.getLength()
= 4
Gets an element by position. If base 0, it starts at 0.
? jsa.getIndexed(0)
= "one"
Gets an element by position. In this case, being base 1, it starts at 1.
? jsa.getIndexed(1)
= 2
Gets an element by position. In this case, being base 2, it starts at 2.
? jsa.getIndexed(2)
= true
Getting an object back by copying it to a variable, creating a new javascript object.
jselem = jsa.getIndexed(3)
Gets the length of the new variable object.
? jselem.getLength()
= 2
Returns the Json for the object.
? jselem.getJson()
= {"firstname":"john","lastname":"public"}
Adding a new property to the javascript variable object.
jselem.setProperty("middlename","Q")Return the Json for the javascript variable object with the new property included.
? jselem.getJson()
= {"firstname":"john","lastname":"public" , "middlename" : "Q"}
BSON Queries and JSON
BSON was created by the developers of Mongo DB. BSON is JSON data that is converted to binary.
Interrogating BSON data from JSON
First define an BSON object that lives in the extension namespace inside of Xbasic.
dim bso as extension::BSON
Next set the BSON object to include the JSON data you wish to query using setJson().
bso.setJson("[\"one\",2,true,{\"firstname\":\"john\",\"lastname\":\"public\"}]")Call your BSON object as BSON data using getBson().
dim bs as b = bso.getBson()
You can look at the binary:
? bs
= 0000 : 4c 00 00 00 02 30 00 04 00 00 00 6f 6e 65 00 10
0010 : 31 00 02 00 00 00 08 32 00 01 03 33 00 2e 00 00
0020 : 00 02 66 69 72 73 74 6e 61 6d 65 00 05 00 00 00
0030 : 6a 6f 68 6e 00 02 6c 61 73 74 6e 61 6d 65 00 07
0040 : 00 00 00 70 75 62 6c 69 63 00 00 00
You can Query against this data as well.
- ? bs.size()
= 76
Getting JSON Back from BSON
Define a JSON object that lives in the extension namespace inside of Xbasic. Put BSON after extension. Only BSON knows how to deserialize BSON.
dim bso2 as extension::BSON
Now set the JSON object against the BSON data you want to convert to JSON using setBson().
bso2.setBson(bs)
Call your JSON object from the BSON data using getJson().
? bso2.getJson()
= [ "one", 2, true, { "firstname" : "john", "lastname" : "public" } ]
Using JSON with Reports
You can create reports from JSON data in Alpha Anywhere. This is useful when you want to use data on a report that comes from a web service off a website or when you want to build data without involving a traditional data source like SQL.
Create a Custom Report using simple JSON data
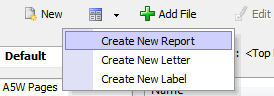
In the Web Projects Control Panel menu click on the Reports(Project) option.
Click the New component or file button. Select Create New Report from the list that appears.
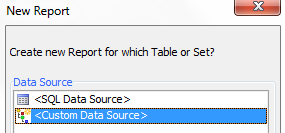
The New Report dialog will open. Specify a <Custom Data Source>.
The Specify Custom Data Source dialog will open. In the Function name property, specify the name of the Xbasic function that will return the data to be printed by the report. Here the Function name is MyJsonReport.

Under the Data format property dropdown select JSON.

Click the button next to the Local Xbasic definition property. Click the Code Editor tab in the Local Xbasic Function Definition dialog when it opens.
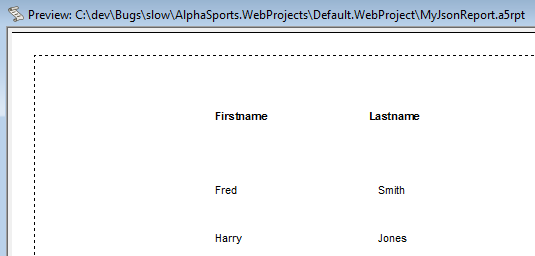
Add the following Xbasic function containing a simple JSON array. Make sure the function name defined in the function, in italics, is the same as the Function name you defined in Step 4. When you are done Click OK.
function MyJsonReport as c(e as p)
    MyJsonReport = <<%json%
    [
        {"Firstname" : "Fred", "Lastname" : "Smith"},
        {"Firstname" : "Harry", "Lastname" : "Jones"}
    ]
%json%
end function
Since no schema is supplied in this function, the data are all considered to be character type of length 1024 characters. While the advantage of this format is that is extremely simple, it does mean that you will need to adjust the size of each field you place on your report because its default size will likely be too large. Notice that the function takes a single input parameter, e. The e object that is passed into the function includes the value of any Arguments that were passed into the report.
When you close the Local Xbasic Function Definition dialog you might notice the Arguments property. Arguments are used for when you want to filter the contents of a report. For example, if you wanted a report on such and such a state in the United States, this might involve creating an argument. If you specified that the <Custom Data Source> uses an argument called whatCountry. Your Xbasic function can reference the value in this argument as follows:
dim country as c
country = argVal(e.arguments,"whatCountry")
Click OK to close the Specify Custom Data Source dialog. The Report Workspace will open up with <Custom Data Source> written in its title bar. Save your Report.
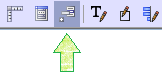
Open the DragDrop List. From the Toolbar.
In the DragDrop List find the section starting with a5_temp_custom_.... and underneath it the two object properties contained in your JSON array, i.e firstname and lastname.

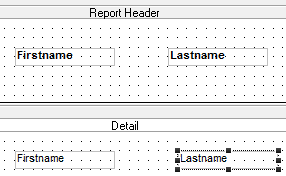
Add these object properties to you report by dragging an dropping them into the Report Header.
The Drop Fields dialog will appear. Click OK. Afterward a checkmark will appear next to each property used.

Drag the second, non-bold, part of the Firstname and Lastname properties down into the Detail section of the Report. Like this:
Click the Print preview the current Report button in the toolbar.
Now you should see the JSON data from the array appear in Report format.
You might want the string you return to be an object with two object properties, schema and data. The schema object property defines the schema of the data (for example, field type, size, etc.) and the data property is an array of JSON objects that define the data for the report. For example:
function myjson as c(e as p)
    myjson = <<%json%
    {
        "schema" : {
            "firstname" : { "type" : "C" , "width": 30 },
            "lastname" : { "type" : "C" , "width": 30} ,
            "company" : { "type" : "C" , "width": 30} ,
            "age" : { "type" : "N" , "width" : 3, "decimal" : 0 }
        },
        "data": [
            {"firstname":"Fred", "lastname":"Smith", "company" : "Alpha Software", "age" : 30},
            {"firstname":"John", "lastname":"Jones", "company" : "Beta Software", "age" : 23}
        ]
    }
%json%
end function
In this code the size and type of each field in the data array is specified; as is the number of decimal places for the numeric field. The data types supported in the schema are:
- C
Character (you must also specify a "width" property for this type)
- N
Numeric (you must also specify a "width" and "decimal" property for this type)
- L
logical
- M
memo
- D
date
- T
date/time
- Y
short time
- E
exponent numeric
- K
guid
- JPEG
Jpeg field (data in the JSON data property is expected to be base64 encoded)
- PNG
PNG (data in the JSON data property is expected to be base64 encoded)
- BMP
BMP (data in the JSON data property is expected to be base64 encoded)
- I
Image Reference Field (data in the data property is a image file name but the report will treat the data as an image).
A schema allows you to extract data from objects within each row, and to map property names in the data array to different names. For example, the address property can be an object with two sub-properties:
{
    "name": "Fred Smith",
    "company" : "XYZ Corp",
    "address": {
        "street": "Main Street",
        "number": 23
    }
}
Shown below is how a function would be defined to return this JSON data:
function myjson as c(e as p)
    myjson = <<%json%
    {
        "schema": {
            "name": {
                "type": "c",
                "width": 30
            },
            "companyName": {
            "source": "company",
            "type" : "c",
            "width" : 30
            },

            "street": {
                "source": "address.street",
                "type": "c",
                "width": 40
            },
            "number": {
                "source": "address.number",
                "type": "n",
                "width": 5,
                "decimal": 0
            }
        },
        "data": [
            {
                "name": "Fred Smith",
                "company" : "XYZ Corp",
                "address": {
                    "street": "Main Street",
                    "number": 23
                }
            },
            {
                "name": "John Jones",
                "company" : "ABC Corp",
                "address": {
                    "street": "Corner Road",
                    "number": 3
                }
            }
        ]
    }
    %json%
end function
Notice that the JSON object has both a schema and a data property. The schema indicates what fields will be available to the report. The list of fields specified by the schema are: name, companyName, street and number. If you enter this code in the Create a Custom Report using simple JSON data: example, you would end up with something like this:
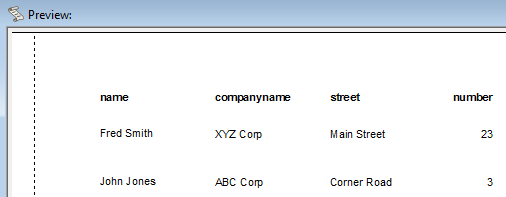
Notice that the data array does not have a property called companyname, even though this data appears in the final report. The schema property for the companyname field indicates that the source of this field is the company property in the data array. Similarly, the street field in the schema is mapped to the address.street property in the data array. Similarly, if the definition for a field in the schema omits the source property, then the source is the same as the item name. Here the definition for the name field in the schema does not have a source property, therefore this field is mapped to the name property in the data array.
Including Image data in a JSON schema object.
JSON objects can include image data.
function myjson as c(e as p)
    myjson = <<%json%
    {
    "schema" : {
        "name" : { "type" : "C" , "width": 30 },
        "image" : { "type" : "Png" }
    },
    "data":
        [
            {"name":"John Smith", "image" : "iVBORw...(data truncated for readability)....AAAElFTkSuQmCC" },
            {"name":"Jane Smith", "image" : "data:image/bmp;base64,Qk02AwAAA...(data truncated for readability)....AAAADYAAAAAA=="}
        ]
    }
    %json%
end function